Product Development Spotlight:
Johnny's Hardpan Broadfork and Seedbed Roller

The Hardpan Broadfork
Several new broadforks have made it to the
market recently, garnering a fair amount of market share and adversely
affecting our own broadfork sales. We have also had a number of broadforks returned to us because their tines were bent. At Johnny's, we stand behind our products 100% and we generally fix or replace those for customers, depending on the situation. Our vendor aids us in those efforts by making those repairs. generally, the bent tine(s) are replaced and the head is given a new paint job.


Ike is a Maine blueberry farmer and rake maker. He owns Hubbard Rake and was approached back in the 90's by Eliot Coleman and Rob Johnston to make our original 520 Broadfork, which debuted in Johnny's catalog in 1998. For those who don't know, Eliot has been our Tools Advisor for many years and has designed and/or developed many of our exclusive tools. He is pictured below.
Ike is a Maine blueberry farmer and rake maker. He owns Hubbard Rake and was approached back in the 90's by Eliot Coleman and Rob Johnston to make our original 520 Broadfork, which debuted in Johnny's catalog in 1998. For those who don't know, Eliot has been our Tools Advisor for many years and has designed and/or developed many of our exclusive tools. He is pictured below.

He is one of our trusted vendors who actively works
with us to develop new products. Last year, we asked Ike to redesign the
broadfork and create some prototypes for us. Several new prototypes were
constructed for field testing, changing slightly each time until we felt we had
achieved what we set out to do - make a broadfork that will accept a higher
level of abuse and work in better in tougher soil conditions. I think together
we accomplished that. Here's how it went...
Development - Prototyping
and Trials:
2/26/13 - Hubbard Rake produced a three slightly different prototypes
for testing - one with round tines but without the 90 degree bend at the top, and
two with tines made out of flat 1/2" plate steel. The latter were cut to a
very sharp point.
3/1/13 - Product trialing
technician, Paul Gallione tested 3 broadforks in high tunnel plus our standard
520 as the control. The model with flat tines suffered both a weld failure and
"fish-hooking" of the points. The round tine model with tines extending
from frame at a 90 degree angle had bending issues. The model with tines
extending vertically through the frame held up the best with repeated
usage. Our standard model also had bending issues. That same day, we met
with Ike, who agreed to remake the plate steel model, but with more blunt ends
to prevent bending (maybe).


3/15/13 - We continued testing
round-tine models. The "new" straight tined prototype bent, thought
this one would hold up but not the case. Tested "new" flat tined
model with modified tips and stronger welds. No issues as of yet, the
modification to the tips has curtailed the "fish hooking"
effect. It had good penetration, but was noted to be somewhat heavier
than round tined models.


5/20/13 - The flat-tined model was
tested in the rocky soil of Paul's hoophouse on his own farm. He managed to
unearth several large rocks with no damage to the broadfork. His opinion at
this point was that it was well suited for heavy and rocky soils.

8/5/13 - In an effort to reduce
weight and cost, a prototype was constructed with thinner 3/8" plate steel.
This tested well, and was easier to use because it had better penetration and
weighed less. Throughout all this, we tried to keep the shape somewhat similar to the curvature of our original broadforks.
 |
| Original tine shape. |
 |
| New tine shape |
8/28/13 - Paul's final recommendation:
"My final review of these prototypes has demonstrated that the model with
the narrow steel tines is the best option. The narrow tines reduced the overall
weight of the product ( only downside to previous model). This improved version
give greater strength, durability, with the same ease of use as the regular
tine model. My recommendation is to add this product specifically for users
with heavy and or rocky soils."
Commercialization:
What needs to be done to bring it
to market? This being what I would call a "spin-off" product,
commercialization is somewhat easy compared to other completely new products.
Well first, it's got to be entered
into our New Product Information System (NPIS). An entry in this system
includes all the pertinent information about this product need by Purchasing, Sales,
Marketing, and Product Management - obvious stuff like part number, price, cost,
vendor, product name, etc., but also other things like product structure and group
categorization, initial forecast, catalog and web copy, harmonized codes for
export, and so on.

Then, we'll need some pictures.
Studio shots? In-use application shots? Yes, on both counts. Video? Maybe some
time soon.

Logistically, what do we need?
Well, a box for starters (packaging). We've got to make sure we've got one it
fits in or special order one that to fit it. We've also got to spec out any packing
material that may or may not have to be added. This was easy because it fits easily
in the same box as our standard 502 Broadfork, so that was a snap. What does it
cost to ship? Is it over-sized or heavy? Will it qualify for additional
shipping charges and if so, how much. In this case, no. Is it 'kitted' with other
parts to make the final product? In this case, yes - handles and wedges. A
kitting instruction must be created.
Then there's the instruction
manual. Do we start from scratch? In this case, no. I was able to modify the
existing broadfork manual to be used (and included) with all broadforks.


QA - If a product does not already
have engineering drawings (and most don't, like this one), then a product spec
must be created with inspection criteria and instructions.
Catalog and web layout - how do we
want this positioned in our customer-facing sales channels? The product manager
follows this through the entire process, making suggestions and editing as
needed.

Product launch and marketing plan - the product must be now
included in the appropriate monthly initiative(s) to support its success. The
PM will advocate for that and support Marketing's efforts as necessary.
The Seedbed Roller

This is a product that was conceived by Eliot Coleman. When
he was on one of his trips to Europe, he saw this roller in a German hardware
store and bought it for smoothing his seedbeds prior to seeding.

It worked perfectly in concert with his other bed preparation tools including the Tilther and Bed Preparation Rake and prepares the bed perfectly for the Four Row Seeder, which needs a firm, level bed for traction and even sowing.
It worked perfectly in concert with his other bed preparation tools including the Tilther and Bed Preparation Rake and prepares the bed perfectly for the Four Row Seeder, which needs a firm, level bed for traction and even sowing.
At some point, Eliot had asked another one of our trusted
and cooperating vendors, Glaser Engineering in Switzerland, if they could
design one. They made the one pictured below.

Eliot, who is on the board of advisors at the Stone BarnsCenter for Food and Agriculture, sent this roller to Jack Algiere, who is farm
manager at Stone Barns. He has been using it ever since. The main difference
between them is that the German model had three rollers which allowed a limited
slip differential and minimized 'plowing' when turning sharply at the end of the
row. Eliot always felt very strongly about this product and advised us to
develop our own. We again asked our good friend Ike for help. His first
iteration looked like this.

It had expanded metal mesh, like the other two and three rollers
like the German model. We had also spoke about how this product would ideally
have detachable dibbles for marking and transplanting. I have seen many growers
make home-made rolling dibblers. This is just one example.

Ike and I came up with the following design for those. I
asked him to make them out of pipes cut at an angle so that the soil would fall
out and he came up with the ring clamp arrangement for them. He even made them
in a couple different sizes.


On 3/1/12, I tested the first roller prototype at Four Season Farm with Eliot. The roller worked fine, but the dibbles did not. First, you needed a lot of weight to make them penetrate. I immediately noticed that when you added weight, the roller wanted to be pulled, rather than be pushed. And, it pulled very hard. It was very clunky, for lack of a better word.
On 3/1/12, I tested the first roller prototype at Four Season Farm with Eliot. The roller worked fine, but the dibbles did not. First, you needed a lot of weight to make them penetrate. I immediately noticed that when you added weight, the roller wanted to be pulled, rather than be pushed. And, it pulled very hard. It was very clunky, for lack of a better word.


So...back to the drawing board. How do we tackle this detachable
dibble issue? Meanwhile, Ike had the uncanny idea to make a roller with lobster
trap wire and he just showed up one day with one and asked us to try it. It was
a triple roller with 24" width and 36" circumference. From a firming
and seedbed prep standpoint, the 1" trap wire mesh worked even better than
the expanded metal did. It was wide enough to let wetter clumps of soil and
clay fall out, but fine enough to firm the bed sufficiently for the needs of the
seeders. This is an image of a training session at the farm in the summer of
2012, where we did a seeder workshop and talked about the roller we were
developing.

One added benefit that we didn't expect was that when used
after seeding for best seed-to-soil contact and maximum germ, the trap wire
mesh also creates a pattern of uniformly spaced mini-furrows that help retain
essential moisture and resist erosion from wind, rain, and irrigation - unlike
turf rollers, which create a completely smooth surface that is easily eroded.

We knew we on the right track, but I wasn't sure about
width. I expected 30" would be a good width, but what about other bed
widths? I posted a question on the Vermont Veg & Berry List Serv and asked
the growers there what bed widths they used primarily both in the field and in
the greenhouse. Most responses were around 30" bed widths, but some of the
larger growers had 36" beds, 48" beds and some, even bigger. I asked
Ike to make several different sizes so I could send them out to a focus group.
We have several of them in the field still, of varying widths from 18 to
48", that we are gathering performance data on.
Below is an example of a
48" roller that we sent to Ben Flanner at Brooklyn Grange, a rooftop farm
in Brooklyn.
 |
| "The Fleet", along with a flame weeder prototype. |

We knew that a 30" model was definite, and with the
catalog deadline looming, Ike and I decided to launch just the 30" Seedbed
Roller for the 2014 catalog, and that is what we did.
We included a 'ganging' rod to tie the three roller cages together so that any models we sell now or in the future may be used for dibbling, which would require three roller cages to turn in unison for consistent spacing.

We also had a bit of logistics with respect to packaging in order to keep the additional shipping down. With its existing girth (L+W+H), the product would need to be shipped on a pallet by truck. We wanted to avoid that, so we adapted it with a 'some assembly required' handle to make the shipping affordable.
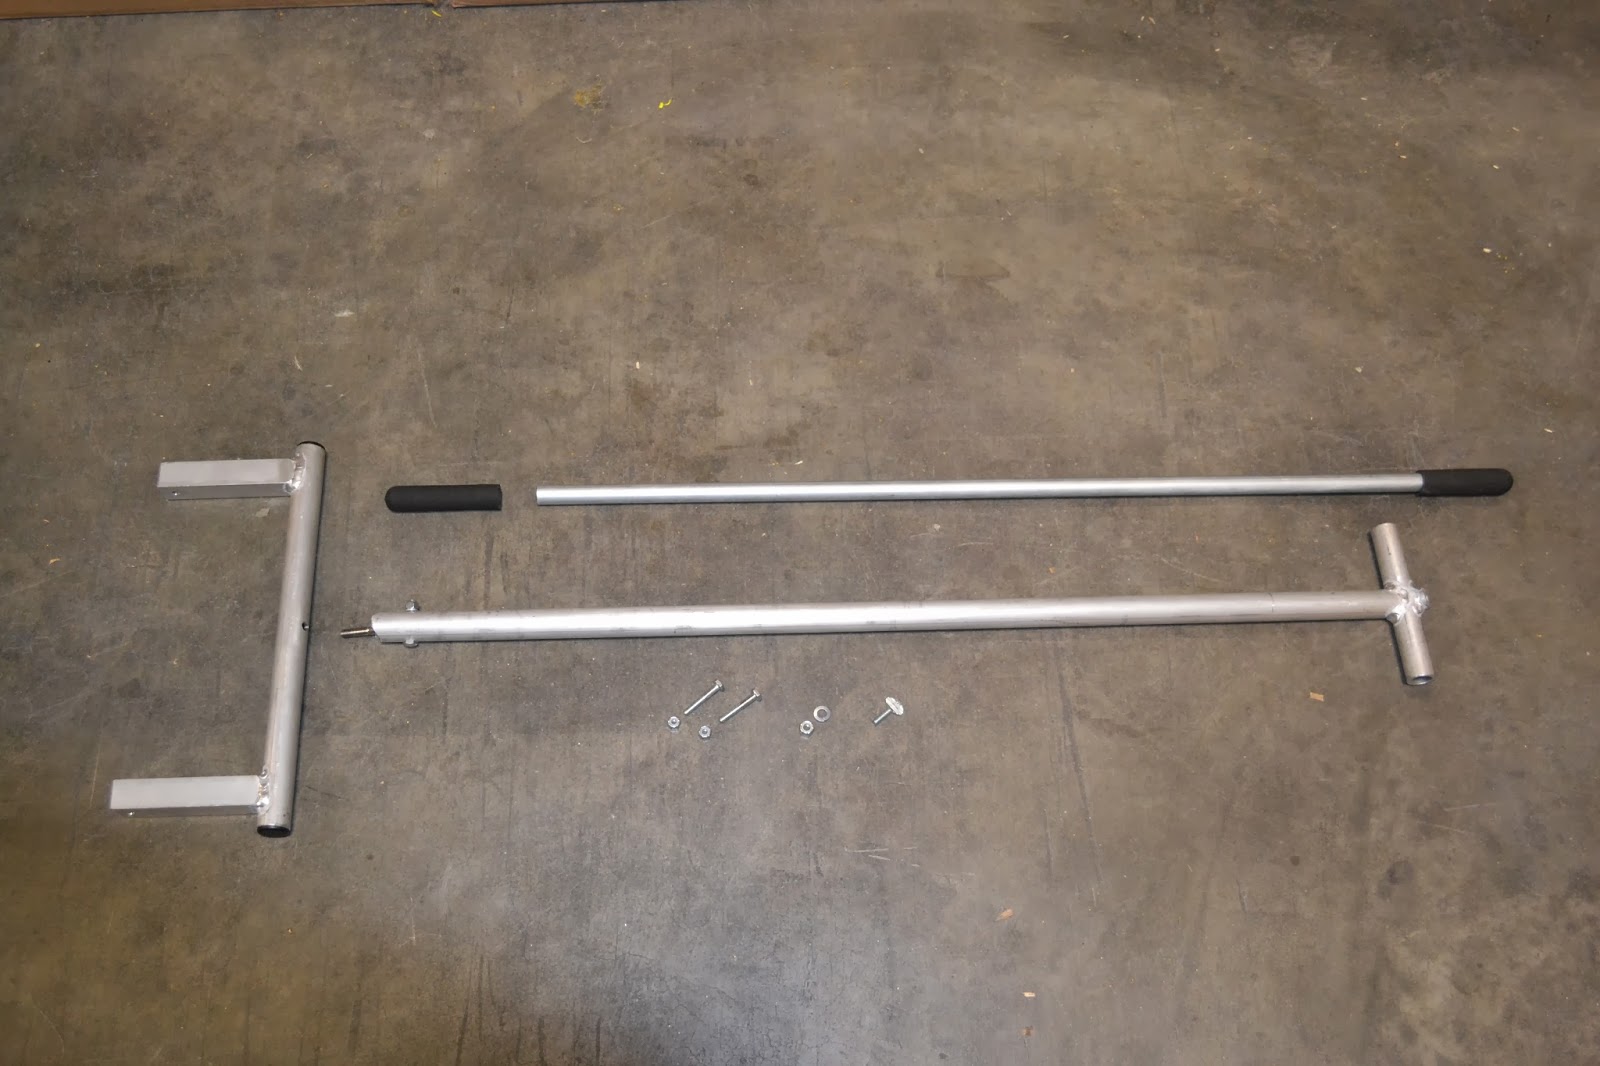
I also had to write a completely new instruction manual for it.

The product was launched in our 2014 catalog, which mailed in November, 2013.
 |
| Jack Algiere, presents a Seedbed Roller at the 2012 Young Farmer's Conference at the Stone Barns Center |
We included a 'ganging' rod to tie the three roller cages together so that any models we sell now or in the future may be used for dibbling, which would require three roller cages to turn in unison for consistent spacing.
We also had a bit of logistics with respect to packaging in order to keep the additional shipping down. With its existing girth (L+W+H), the product would need to be shipped on a pallet by truck. We wanted to avoid that, so we adapted it with a 'some assembly required' handle to make the shipping affordable.
I also had to write a completely new instruction manual for it.
The product was launched in our 2014 catalog, which mailed in November, 2013.

Dibbles
In the Spring of 2013, while Ike was working on roller
models, I was working on dibbles. I enlisted the help of a local engineer, Pete
Bailey at Machining Innovations, to help design them. I originally had conceived the dibbles being solid,
maybe plastic, and they needed to snap or turn into the mesh for quick on-off
operation. In my mind, we were no longer trying to scoop soil out the holes,
but to poke a hole into the ground, firming the soil around it like a water
wheel transplanter does. Pete wasn't familiar a water wheel, so I looked one up
in the Rain Flo catalog and that is when we saw this pic of their detachable
dibble model.

The light came on. I ordered a bunch of their dibbles on the spot. After they came in, we went over them and decided what we needed to do to adapt them to the trap wire mesh. Pete came up with some initial drawings.

We used our Hatfield Transplanters as a size model in that, the dibbles would be sized for transplanting up to 1.5", 2.0", or 2.5" plugs. It was a place to start at least and seemed logical to me. When the drawings were finished, we discussed who to send them to for prototyping. Pete suggested Rain Flo. Who better? They were already making something very simple. So, I called them I spoke with Norman Zimmerman and explained to him what we were doing and that we had adopted their design in order to do it. He was happy to make the dibbles for us. So I ordered them.
The light came on. I ordered a bunch of their dibbles on the spot. After they came in, we went over them and decided what we needed to do to adapt them to the trap wire mesh. Pete came up with some initial drawings.
We used our Hatfield Transplanters as a size model in that, the dibbles would be sized for transplanting up to 1.5", 2.0", or 2.5" plugs. It was a place to start at least and seemed logical to me. When the drawings were finished, we discussed who to send them to for prototyping. Pete suggested Rain Flo. Who better? They were already making something very simple. So, I called them I spoke with Norman Zimmerman and explained to him what we were doing and that we had adopted their design in order to do it. He was happy to make the dibbles for us. So I ordered them.
While we were waiting for shipment, I got to work on possible
dibble configurations. Ike had purposely made the rollers with a 1" mesh
and 36" circumference for a reason - to make the math simple when attaching
dibbles. Below are just a few of the probable spacing configurations I came up
with. I also used these to calculate forecasts and quotation quantities for the
dibbles.


We got the dibble prototypes in September of 2013, and Paul
Gallione and I field tested them. The design for them called for the dibbles to
be cut, bent, hardened, and then plated. They were very hard, and we had some
difficulty squeezing then into the mesh, especially the smaller ones. We even
had to use water pump pliers to install them, but I think that also helped keep
them securely in place, so I wasn't adverse to that aspect entirely.


Some of the small ones actually suffered brittle fracture and broke during installation. None broke during operation, though.

We tested it in very dry soil conditions inside a high tunnel that had been fallow all season. The dibbles had difficulty penetrating in this conditions.

We tested it in open soil in the field on a bed that had been prepared months earlier and had good penetration there.

Then, we tried it on some unplanted portions of plastic mulch that had been laid at the beginning of the season. It worked very, very well through the mulch and into the most soil beneath.


In all three cases, we had to add some weight and were better served pulling the roller. We decided that we had a solid design, but we needed to clear two hurdles before we could go further - we needed to address the brittle fracture issue, and we needed to find a way to take some cost out of them because at their current cost, our price to the customer would likely be prohibitive. I contacted Pete Bailey again and we revised the design for smaller dibbles, and I again asked Rain Flo to make more prototypes. Norman assured me that he would dial back the hardening process somewhat so that we would not have that problem again. That is where we stand now, awaiting shipment from them for further testing.
Some of the small ones actually suffered brittle fracture and broke during installation. None broke during operation, though.
We tested it in very dry soil conditions inside a high tunnel that had been fallow all season. The dibbles had difficulty penetrating in this conditions.
We tested it in open soil in the field on a bed that had been prepared months earlier and had good penetration there.
Then, we tried it on some unplanted portions of plastic mulch that had been laid at the beginning of the season. It worked very, very well through the mulch and into the most soil beneath.
In all three cases, we had to add some weight and were better served pulling the roller. We decided that we had a solid design, but we needed to clear two hurdles before we could go further - we needed to address the brittle fracture issue, and we needed to find a way to take some cost out of them because at their current cost, our price to the customer would likely be prohibitive. I contacted Pete Bailey again and we revised the design for smaller dibbles, and I again asked Rain Flo to make more prototypes. Norman assured me that he would dial back the hardening process somewhat so that we would not have that problem again. That is where we stand now, awaiting shipment from them for further testing.
So far, the 30" roller has been very well received. We
hope to launch a line of dibbles and possibly a couple more roller sizes in the
coming season. Please stay tuned.
Thanks!
Adam.
Adam Lemieux
Tools & Supplies Manager

Copyright © 2014 Johnny’s Selected Seeds. All rights reserved.
Adam,
ReplyDeleteRegarding the roller/dibbler combination, what makes the cost prohibitive above the $249 price tag? Do the dibbles add that much more to the price or is it something else? Really like the prototype.
At this point, the dibbles will be anywhere from $6 to $10 each (depending on size), over and above the $249 price tag for the roller. To me, that seems like it will be prohibitive for most. Bottom line - I'd prefer bring the price down before we start selling them, if at all possible.
ReplyDeleteI'm glad you guys are always trying to be cost conscious, but efficiency and speed are gained by a tool like this. I think added cost isn't a bad thing, especially if you are using the same spacing for multiple crops. What's most important is if the grower has a market to move their product, worrying about cost wears me out over time and I'd rather just sell a few more items to cover the difference. Professional growers won't blink at the price tag IMO. Keep up the good work.
ReplyDeleteHello Adam,
ReplyDeleteWhen I saw the roller in the catalog I thought it was a "nice to have" product but not essential. When I saw this post about adding dibbles to the roller I got really excited. I have felt that we need to bring the water wheel/dibbler to the small scale intensive farmer without needing to use a tractor to pull it. I hope you continue to pursue this. I that $6-10 is too high as most won't understand the price for bent sheet metal. I suspect making it springy and not brittle is the problem. Perhaps consider going a different route with more rigid bolt on where you stick your hand inside the roller with a ratchet screwing on a nut (that has a washer welded to it).
How well would the roller (without dibbles) work to increase seed/soil contact after broadcasting a cover crop, such as buckwheat or rye? That job is currently done here with a light rototilling, but I think I'd much rather pull the roller if it would work. Thanks for any thoughts.
ReplyDeleteAdam,
ReplyDeleteHydrogen embrittlement during and after plating is a likely cause of your fracture problems. Dropping the hardness level helps but a bake out operation after plating should cure it.
I have read your blog. Really very helpful post for farmers. We also offered mulching machine.
ReplyDeletethe 30" roller appears to be unavailable - can the 36" roller be used on a 30" bed with success
ReplyDelete